
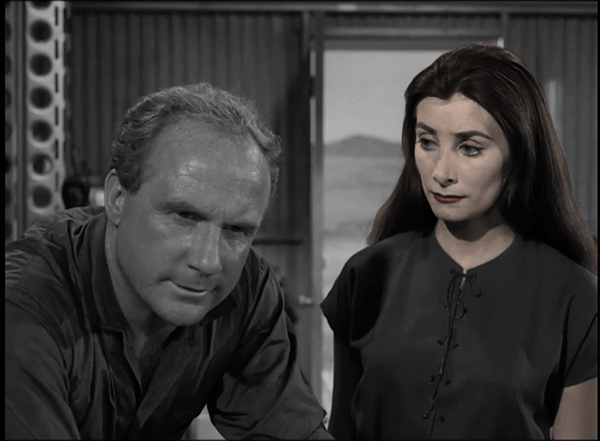
 The seed for this idea came from seeing @arlanamcbear’s take on the color splash assignment, and when the idea was seconded in a comment by Andrew Forgrave, I had to do it. The scene comes from the Twilight Zone episode “The Lonely”, where a convict is serving a 50 year sentence in solitary on an asteroid. The sympathetic commander of the supply ship drops of a female android to keep him company. I liked this shot because she’s relatively motionless except for the blink, so it has easy GIFfing possibilities.
I used QuickTime Player on my Mac to capture a screen recording of the segment of the episode. I brought the recording into Photoshop through FIle->Import->Video Frames to Layers, then deleted a lot of frames until I was down to eight.
I made a new layer at the top of the layer stack and used the lasso tool to select around her lips. Then I filled that with a reddish color, and played with the layer blending and opacity until I thought it looked okay. Emboldened by my success, I moved on to her hair, then her skin. That part was a little tricky because I didn’t want to give her skintone eyeballs. So with her face area selected, I deselected the eye area by holding down the option key as I made a second selection path around each of her eyes. I was a little worried about how that might look when she blinked, but it’s a small area and a quick movement so I thought it would be okay. If you freeze the frame where her eyes are closed, the uncolored area just looks like eye shadow.
 Then I decided I wanted to freeze the male character. I took the top layer of the stack and copied and pasted it into a new image. I cut a hole out of it where she was, using the lasso tool with a feather setting of 3 px to soften the edges, and then pasted what was left into a new layer at the top of the stack on my original file.
 And voila! Blinky colorized robot companion! It doesn’t look quite real, but that’s okay because she isn’t supposed to be quite real, even in the Twilight Zone.

Very nicely done, and a great explanation. The android kind of has a Morticia Addams look to her with this treatment — but a quick check on the Internet shows that the actress Jean Marsh starred in many shows of which I am familiar, but did not play on The Addams Family.
Thank you for your mentioning of the 3px feather on your lasso — I’ve not yet come to an understanding with feathering and sometimes really have to mess with my mask after the fact to remove a hairline outline that shows. I really spent a lot of time fixing this during my Kill, Baby, Kill coffin GIFs. In some places I can see spots where I gave up due to the time it would have taken. So I’ll play around some more with the feather to get a better grip on how to use it.
GIFs are such a great way to learn about layered-image editing. The learning goes on and on.
This is gorgeous, it should be its own assignment. You and Andy Forgrave or in a zone of your own right now, I mean you are following this up on the Daftest of Pimps. Awesome to witness how hot you are, you are throwing rocks tonight, Donnie!
Awesome is right! And this happens to be one of my favorite episodes. My next assignment is to learn how to create a GIF. Haven’t made one of those yet.
I am in awe! This is super cool. And I want to do it. So I have a question: from your description, I’m getting that you didn’t do any layer masking for colouring parts of the image but not others, but rather just made new layers and filled selections (lips, skin, hair) with colour, then made the colourized layers more or less opaque, playing around until you got this look. Is that right? It works really well here, because she is supposed to be an android, so the strange colour is perfect. Well done!
Yeah, you got it. I haven’t worked enough with layer masking to feel like I know what I’m doing, so instead I just piled layers on top. You can sort of see the layers in the last image. In addition to playing with the opacity, I also tried different layer blending modes, using Overlay or Multiply instead of Normal. It was fairly easy with this shot because the parts that I colored do not move. If they did, I would have had to color it layer by layer.
I’ve had this tab open on my computer for the past 3 days just so I can flip over to watch this GIF every so often….it’s awesome! I really need to figure out layer masking so I can do some nice cinegraphs-style GIFs like this.
Wait… so you’re stalking my GIF? Who’s creepy now? But seriously, thanks. The way I did the masking is pretty crude, but it works as long as the movement is isolated to one area. I tried it a while ago with another video (http://blog.raptnrent.me/2012/12/27/mutant-muppet-party-puppets/) and you can see some defects in the background.
Wow! I just saw this featured in the slides from the talk Jim Groom gave at New Hampshire at Plymouth State University and it is amazing! Thanks for including how you did it.
Thanks! It’s kinda cool the way we can just put stuff out there and all of a sudden people start talking about it in places like New Hampshire and Saudi Arabia.
Very cool and creepy. You really are taking these animated GIF assignments to the next level.